It’s August Archives (yes, I’m still plugging away on this Resin Jewellery book!) so today I’m sharing another tip—this time, for organizing.
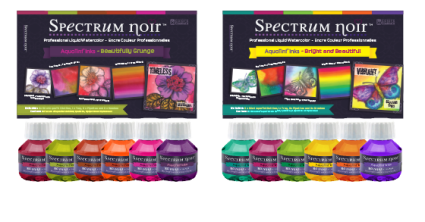
I really love the AquaTint range from Spectrum Noir. These are liquid water paints that come ready to use straight from the bottle. I’m showing two sets below, but there are more (6 in total), ranging from brights to neutrals. They’re easy to use to create a wash of color, or to paint in stamped images.
Here’s a card I did for the Summer 2015 issue of the online (and free!) magazine, Bella Crafts Quarterly—
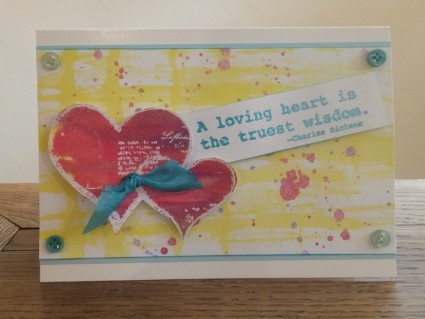
The background, the hearts and the spattering are all done with AquaTints, using a brayer and pipettes. You can see the step-by-step process in the video on Spectrum Noir AquaTint Cardmaking for Bella Crafts Quarterly on You Tube, by the way. You can also read the free online Bella Crafts Quarterly magazine for this project (it’s on page 60) plus loads of other designs and inspiration.
Back to organizing: I learned these two tips from the lovely Sheena Douglass, and they’ve been really helpful in keeping my AquaTint colors organized so I can choose and find colors quickly and easily. It’s really difficult to tell what color is in each of the bottles just from looking at them, and they’re only labeled with a number rather than a descriptive name. So Sheena’s tips make things much easier.
First is to create a simple color swatch for each of the AquaTint sets:
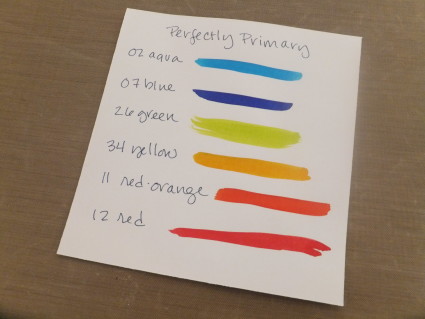
It’s just a quick swipe of undiluted color on a piece of regular white matte cardstock. I have one for each of the sets of AquaTints, and they’re all taped up on my wall so I can tell at a glance which color I want to use. The bottle labels only have color numbers so you get to play the Name Game and make up your own.
The second trick is to label the top of each bottle:
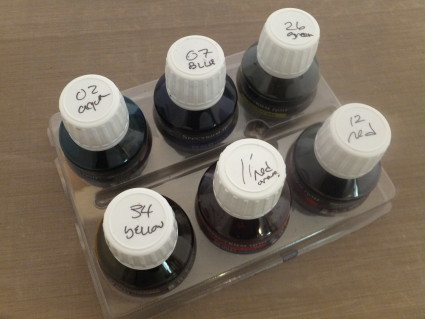
I store mine in the plastic container that comes with each set. You’re supposed to use the wells in the container to place the paint or mix it—but my craft table can get really crowded and it’s just best if anything liquid is somehow kept upright and stable. This is not something you want knocked over onto your project!
The downside with that plan, however, is that you can’t see the color label on the side of the jar. Instead, I use a Sharpie or other permanent marker to label the top of each cap with the number and a color name. This way I don’t have to pull out each bottle from the plastic container.
Between the labeling and the color swatches, it’s way easier for me to choose and find the right color. And because I tape the swatches on my wall, it’s also a reminder to me to use my AquaTints, since they’re normally stored in a drawer out of sight.
Of course, these tips can work for lots of other coloring mediums, too. You can create swatches for any paints or sprays and it will make finding and using them much easier!
Happy Wednesday!