Happy Wednesday. Wait, you might say…is this a Christmas card??? In June???
Why, yes it is. Never too early, right?
All panicked joking aside, I wanted to share a Christmas card as I’ve been up to my eyes with Christmas Couture cutting dies. Earlier this month, I was on Create and Craft’s Santa’s Wish List special…a solid week of Christmas die cutting, so you can consider me well and truly in the holiday spirit.
(Since the weather in England was rainy and gray, it actually wasn’t much of a stretch.)
Defining Moments Couture Christmas Card, what you need—
– Create and Craft Couture Defining Moments Collection – Celebrate Christmas
– Altenew Lyrical Script stamp set
– Embossing inkpad
– Heat embossing tool
– Die cutting machine
– Mini brayer
– Cardstock: Red, green, lime green, white, kraft
– Gold embroidery thread
– Gold embossing powder
– Everyday Essentials Glue With Precision Metal Tips
– Square white card
Defining Moments Couture Christmas Card, how to make it—
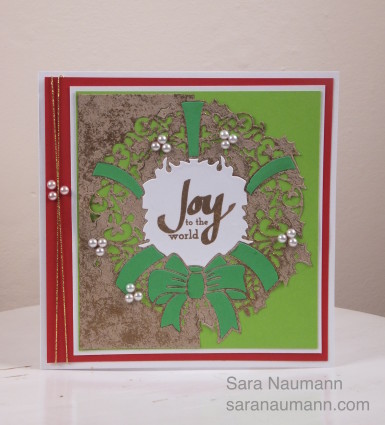
First, a note: Each of the dies in this collection can be used to cut an “edger” or a “topper”. One pass through your machine will result in a shape that’s half cut from the cardstock, with the other half of the design in the cardstock. If you want to cut the shape as a topper, just tape the complementary die in place and run it through a second time.
1. Place the Wreath Edger die onto kraft cardstock and die-cut. You will have a wreath that’s half cut into the cardstock and half out. Locate the end of the cut line at the top and bottom of the wreath design and snip to the edge of the cardstock.
2. Use the brayer to ink lightly over the die cut piece with embossing ink. Sprinkle with gold embossing powder; tap off the excess and heat set.
3. Mat on light green cardstock, then white and red. Leave a slightly wider border on the left side of the red mat. Wrap the red border with gold embroidery thread. Glue to the card front.
4. Cut a second wreath from white cardstock. Save the cut wreath for another project, salvaging the center “innie”. Stamp and gold-emboss the sentiment in the center of the innie. Glue inside the kraft wreath.
5. Cut a third wreath from green cardstock. Again, salvage only the innies, this time of the ribbon. Glue inside the open spaces of the kraft wreath.
6. Glue clusters of pearl accents on the wreath and border.
So easy…and now you have an idea for the upcoming Christmas season! For crafters outside of the UK, you might wonder where you can get these cutting dies…Keep an eye out at Create & Craft USA, that will be the first place in the States to have them.
Happy Wednesday!