Happy Wednesday! (Okay, let’s make that a happy Thursday—I’ve just returned from a craft industry trade show and conference in the UK and am just unpacking and getting re-sorted.)
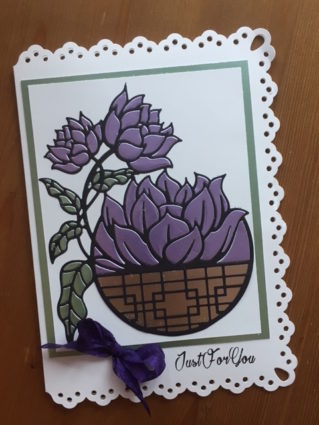
This week I want to share a simple and effective technique for creating different areas of color and texture in your cards, when working with open-area cutting dies like this Couture die from Create and Craft:
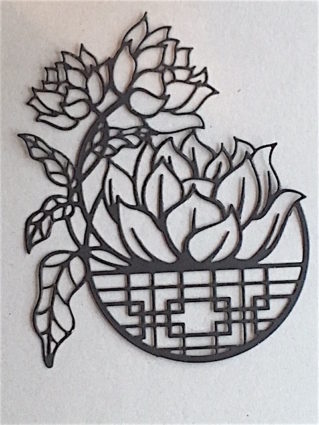
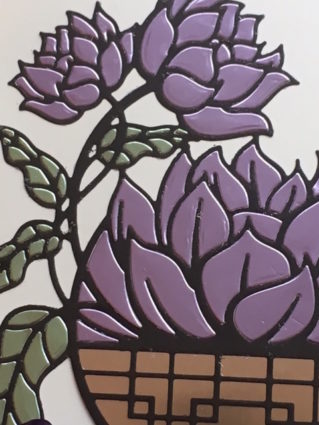
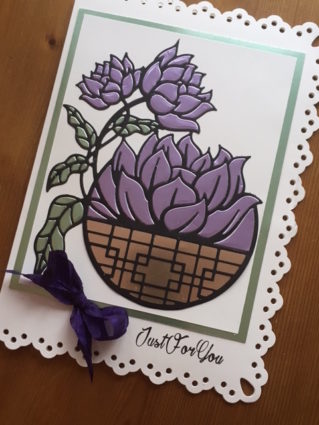
See all of those open areas? This design looks beautiful when simply cut and placed on a contrasting piece of card—yet, it’s also fun to fill in some of the open areas by coloring them in with pens or pencils. Of course, you can also fill in the open areas by paper piecing with the leftover, or “innie” pieces of the design. Let’s take a look:
Die-Cut Paper Piecing with Couture, what you need—
Couture By Create and Craft Defining Moments Collection – Destination Dreams: Create and Craft
Dreamees Hanging Basket stamp set
Create and Craft Pack of 30 A4 Satin Board 250 GSM: Create and Craft
Create and Craft Pack of 50 A5 White Scalloped Card and Envelopes: Create and Craft
Black inkpad
Black, white cardstock
Purple silk ribbon
Die-Cut Paper Piecing with Couture, how to do it—
- Die cut the flower basket from black card. Place a snippet of gold satin card behind the bottom portion of the basket and glue; when the glue has dried, trim around the outside edge.
- Glue the flower basket onto white cardstock, taking care that all areas are firmly attached. Tip: You can use a glue stick to glue intricate dies, or a spray mount adhesive also works well.
- Die cut the flower basket from purple satin card. Remove the piece from the cutting machine but keep the innies in the metal die. Working in one flower at a time, place a bit of white glue in the open areas of the design and use the poky tool to gently remove the petals and place them in their corresponding places. Tip: Tweezers might be a help!
- Die cut the flower basket from green satin card and repeat the process to fill in the leaves.
5. When done, mat on green satin card and glue to the front of the eyelet-edged card blank. Stamp the sentiment at the bottom right corner and add a purple bow.
Enjoy! (And happy Thursday!)