This week on Studio SN on You Tube: How to make your own washi tape—or, tissue tape, as it’s also referred to.
I love washi tape. I have a lot of different widths, styles and patterns—but sometimes I really want to customize my tape to my project, and sometimes I just don’t have the right patterned tape on hand. And living here in a crafter’s no-man’s land, it’s not like I can pop out to the shops to browse for new designs. So, it’s good to know how to make your own!
Here’s what you’ll need:
– Tissue paper. I used plain white, and a leopard print. The white was rescued from a gift-wrapped item, and the print came from the florist. They can be wrinkly, but not torn or dirty.
– Double-sided tape, 1/2″ wide and 1/4″ wide
– Stamps: ESN03 from Paper Artsy
– Inkpad: Bark from Clearsnap
– Dye color spray: Stephanie Barnard Bubble Gum from Clearsnap
– White cardstock, green vellum
– 5″x6 1/2″ blank white card
– Bone folder or spoon to burnish with
Here’s how:
1) Spray Bubble Gum onto a piece of white tissue. Let dry, then turn over and apply 1/2″-wide strips of tape. Burnish well, then trim excess tape.
2. Turn the patterned tissue face down, then apply 1/4″-wide tape. Burnish and trim.
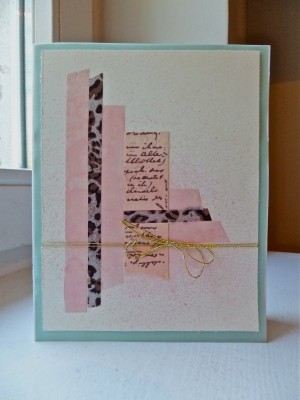
3. Spray Bubble Gum onto a piece of white tissue; let dry, then stamp the script border with Bark. Let dry, then place two strips of 1/2″-wide tape side-by-side. Trim.
4. Cut the strips and place them as shown on a 6″x 4 1/4″ piece of white cardstock. Spritz with Bubble Gum, then wrap with gold thread and mat on green vellum. Glue to card front.
– Gold metallic thread
Want to see a demonstration? Then pop on over to Studio SN on You Tube!
Happy Wednesday!