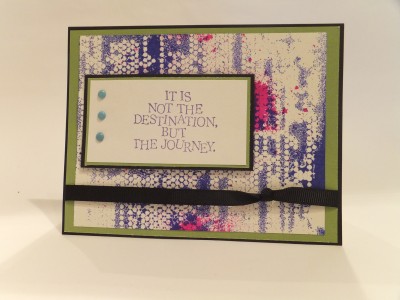
This week on Studio SN on You Tube…Dylusions color sprays and stencils!
I love how this technique is always surprising—you can get so many different effects depending on the colors you choose and the stencil you pick. And because you’ll blot one spritz with another piece of cardstock, you’ll come away with two backgrounds. Fun, inky and time-saving!
Supplies you’ll need:
• Funky Fuchsia, After Midnight Dylusions from Ranger
• Tiny Circles stencil from The Crafter’s Workshop
• It is Not the Destination stamp from Inkadinkadoo
• Plumeria purple ink from Clearsnap
• Cardstock: White, green, black
• Teal brads
• Black ribbon
• Cardboard box or surface to spray on
• Blank card
Here’s how to do it:
1. Spritz Funky Fuchsia onto a piece of white cardstock. Blot with another piece of cardstock to get a mirror image. Set the first piece of cardstock aside, then place the stencil on the second piece and spray with After Midnight. Leaving the stencil in place, blot with the first piece of cardstock.
2. Choose which piece you’d like for your card; save the other for another project. Cut to 5 3/4″ x 4 1/2″.
3. Mat on green cardstock. Tie a knot in a piece of black ribbon and wrap around the matted piece.
4. Cover a blank card with black cardstock. Add the stenciled piece on top.
5. Stamp the sentiment in purple, then mat on green and black. Add three teal brads as shown and glue to the card front.
Want to see the video demonstration? Then stop on by Studio SN on You Tube! Hope to see you there!