
Today on Studio SN: Patterned Heat Embossing with WOW Embossing Powder!
I am so excited about this technique—it came about while I experimented with embossing powder as a background, and the sheer possibility of making patterns in the powder before it’s set was totally amazing to me! I think my poor husband was a little overwhelmed when I tried to explain my enthusiasm. (He does take these things as normal, though.)
So here’s the cool thing: You can squash embossing ink onto your paper, add embossing powder, then sketch in patterns and designs before you heat-set it!
Here’s what you need:
– Primary Luscious Lime Embossing Powder (WOW Embossing Powder) UK peeps, you can visit the WOW UK home page for info; US and Canadians, try the US site. Anyone in the world can order them from Paper Wishes.
– Glossy white cardstock
– Wooden chopstick
– Sheet of scrap paper, folded in half
– Hey Cupcake Dazzles (Hot Off The Press)
– Spectrum Noir alcohol pens: CR8, BP6, CG4 (Crafter’s Companion); US and Canadians, you can find these at Paper Wishes.
– Foam tape
– White matte cardstock
– Pink patterned paper: Grapefruit Paper Pack from Hot Off The Press
– Heat tool
– Black and white checked ribbon
– 5″ x 6 1/2″ blank white card
Here’s how to do it:
1. Press your Versamark pad directly onto a 4 1/4″ x 4 1/2″ piece of glossy cardstock, covering it completely. Place the cardstock on scrap paper and sprinkle on embossing powder. Tap off excess powder and funnel it back into the jar.
2. Use the pointy end of the chopstick to draw a plaid design in the embossing powder. Use the blunt end of the chopstick to remove powder from all four sides of the cardstock. Tap off excess powder. Note: This powder tends to be really inky, so I don’t return it to the jar since it can contaminate the rest of the powder inside.
3. Use the heat tool to heat-set the embossing powder. Be sure to let it cool before handling.
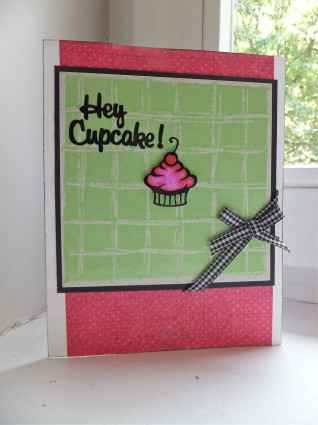
4. Mat the piece on black cardstock, then add Hey Cupcake stickers at the top left. Wrap the bottom right corner with gingham ribbon, then tie a bow in another piece of ribbon and glue on top.
5. Place the cupcake sticker on white cardstock and color the wrapper with CG4, the cupcake with BP6 and the cherry with CR8. Use CR8 to highlight the cupcake by coloring around the outline. Cut out the cupcake and attach it to the embossed background with foam tape.
6. Glue a 4 1/4″-wide strip of pink patterned paper to the card front, then glue the embossed piece on top.
So easy—and addictive! What other kinds of patterns could you make? I’m thinking swirls, stripes, dots…
For a video tutorial, please stop by Studio SN to see the Patterned Heat Embossing with WOW segment.
Happy Wednesday!


