
Today on Studio SN: Spectrum Noir Acetate Plaid!
This week I have a super-simple technique for you—one that’s easy to do but has tons of design possibilities. Once you see how easy this is, you’ll start thinking about the different effects you can get depending on the pen colors you choose and which pen tips you use. Take a look:
Here’s what you need:
– Spectrum Noir Alcohol Pens in Purples (Crafter’s Companion); if you’re in the US, you can get them at Paper Wishes
– Acetate (I used Crafter’s Companion Heat-Resistant Acetate but you could use a generic brand as well since we’re not heat-setting)
– White, black, blue cardstock
– 2 1/2″ scallop circle punch
– 1 3/4″ circle punch
– Black brads
– 1/16″ hole punch
– Sheer blue ribbon
– Stamps: Birthday Greetings from Hot Off The Press
– Black inkpad
– Foam tape
– Lined notebook paper
Here’s how to make it:
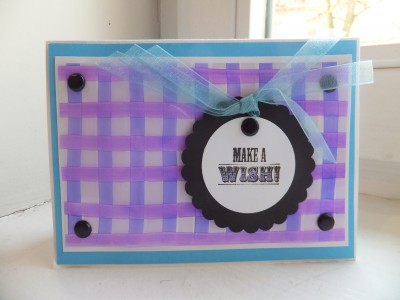
1. Place the acetate on a piece of lined notebook paper and align the top of the acetate with one of the lines. Hold it steady while you use the chisel tip of LV2 to draw horizontal lines across the acetate, along every other notebook line. Repeat with the chisel tip of LV3 on alternate lines.
2. Turn the acetate a quarter to the right and re-align the edge with the notebook paper lines. Use PL4 to draw on every other line. Cut to 5 1/4″ x 3 1/4″. Punch holes in each corner of the acetate, then mat on white cardstock, securing together with brads.
3. Stamp “make a wish” on white and circle-punch. Color “wish” with LV2, using the fine-tip. Mat on a black cardstock scalloped circle. Use foam tape to secure it to the acetate piece. Tie a not in sheer blue ribbon and glue to the top of the circle.
4. Make a 5 3/4″ x 4 1/4″ blank white card. Cut blue cardstock slightly smaller, then glue to the center. Glue the acetate piece on top.
That’s it! Try using the fine tip of the pens, or both fine and chisel for variety. Mix your pen sets and go for something really colorful, or play with tone-on-tone effects. Place your acetate on plain cardstock or a piece that’s been color sprayed…well, you get the idea!
For a video tutorial (that includes my no-measure-hole-punch trick) visit Studio SN on You Tube!
Happy Wednesday!
Hello, thanks a lot for the tutorial.
I am in Germany and am not sure about LV2, LV3 and PL4.
Can you PLEASE explain briefly.
Heidi
Hi Heidi,
No problem! The LV2, LV3 and PL4 refer to the names of the pen colors. So, LV is “lavender” and PL is “purple”…the numbers would refer to their place on the color spectrum. This makes it easier for crafters to match colors and gives more range than just “light lavender, “medium lavender”, etc. Hope this helps!