
Today on Studio SN: Cardmaking with Dylusions Paint!
Dylusions paint from Ranger is a really fun medium to use on cards. The paint, developed by Dyan Reaveley, is meant for art journaling and other types of paper crafts. It’s quick-drying and comes in a range of bright, vivid colors. It also comes in a wide-mouth jar, which is a surprising benefit—it’s wide enough so that you can dip in a paintbrush, hotel key card, palette knife or sponge to pick up paint, rather than having to squeeze it out from a tube. It cuts down on waste and offers some new opportunities for application.
Cardmaking with Dylusions Paint, what you need:
Vibrant Turquoise Dylusions paint (Ranger)
HP1204 stamp set (PaperArtsy)
Acetate: Heat-resistant acetate from Paper Wishes; if you live in Europe or the UK you can find it at Crafter’s Companion
Hotel key card or old credit card
Water mister
Glossy white cardstock
Matte cardstock: Black, yellow, kraft
Jet Black Archival ink (Ranger)
Toilet paper roll
Red gingham ribbon
Black button
Cardmaking with Dylusions Paint, how to do it:
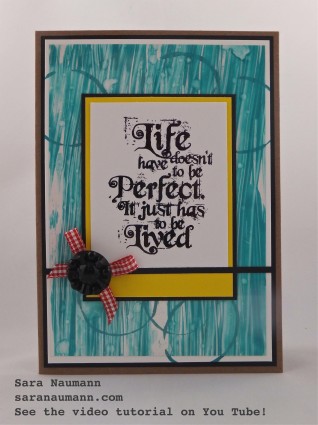
1. Dip hotel key card in paint jar and streak across a 6 1/4″ x 4 1/2″ piece of acetate. Spray water into the palm of your hand and flick onto the wet paint.
2. Let air dry (if you don’t have heat-resistant acetate) or speed up dry time with a heat tool (for heat-resistant acetate only). Set aside.
3. Use the key card to put paint onto a palette. Use the loo roll to randomly stamp circles on the glossy white cardstock. Let the cardstock dry.
4. Stamp the quote on white cardstock, then mat on yellow cardstock, leaving a wider border at the bottom. Glue to the acetate, then glue the acetate to the circle-stamped white cardstock—placing glue only behind the stamped quote. Mat on black cardstock.
5. Cut a very narrow strip of black cardstock and glue across the piece, overlapping the quote and the yellow mat as shown. Glue the piece to a kraft card blank.
6. Tie a bow in red gingham ribbon and glue on the left side of the card front. Glue a black button as shown.
To see a video tutorial of this technique, just visit Studio SN on You Tube to watch the Cardmaking with Dylusions Paint video.
Happy Wednesday!


