
Today on Studio SN on You Tube: Layered Acetate with Spectrum Noir & Quietfire!
Here’s a fun way to get instant color to show off a beautifully stamped card sentiment!
You know I love my Spectrum Noir alcohol pens—they’re ideal for coloring non-porous surfaces like acetate. Even better, they can be used to highlight stamped images as well, creating layers of depth and dimension.
I’m using one of the Gentle Thoughts stamp sets from Quietfire Design—I love its elegant scallops and lettering, so I wanted the colored background to accentuate it without compromising the beauty and sentiment of the stamps. I think the alcohol pens give just the right amount of color, and tracing the scallop edges of the frame stamp give it a pretty shadow effect.
Here’s what you need:
– Spectrum Noir pens: PP5, CG2, BT5 (Crafter’s Companion)
– Acetate
– Rubbing alcohol in a spray bottle
– Black Surfacez ink from Clearsnap
– Happy Family Days stamps from Quietfire Design
These are red rubber unmounted stamps, so you’ll need a block and some way to adhere the stamp. I used Crafter’s Companion Rock a Blocks and Stick & Spray. Crafter’s Companion has a US site here and a UK/Europe site here.
– Rosemary & Thyme paper pack from Hot Off The Press
– Blue grosgrain ribbon
– Glue stick
– White cardstock
– Blank white card
Here’s how to do it:
1. Cut a 5”x4” piece of acetate. Use the chisel tip of the CG2 (lemon lime) Spectrum Noir pen to scribble across the center, leaving the edges uncolored. Let dry—this will only take a second.
2. Repeat to scribble with the chisel tip of PP5 (pink) pen in just the center of the lemon lime.
3. Spritz lightly once with spray rubbing alcohol. Repeat to create more of a spatter effect.
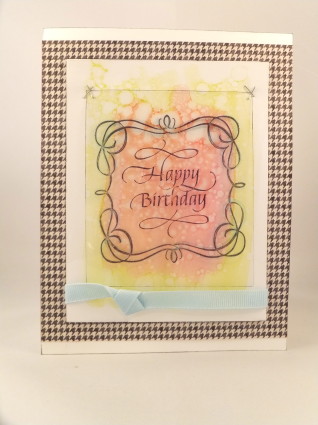
4. Use black Surfacez ink to stamp the frame and Happy Birthday in the center of a 3 3/4” x 3 1/4” piece of acetate. Flip the piece over and use the fine tip of the BT5 (blue) pen to trace alongside the stamped frame. Flip over and ink the edges with black.
5. Use a touch of stick glue in the center to secure the stamped piece on top of the inked piece, then add mini staples at the top corners.
6. Mat on a 5” x4” piece of white cardstock, then wrap with blue ribbon. Glue a 6”-tall piece of houndstooth paper to the front of a 6 1/2” x 5” blank white card, leaving the top and bottom edges showing. Ink the edges black.
7. Glue the stamped piece in the center.
Want to see a step-by-step video tutorial for this technique? Just pop on over to on Studio SN on You Tube to watch the Layered Acetate with Spectrum Noir & Quietfire video! And for more beautiful stamps, do pop on by Quietfire Design.
Happy Wednesday!


