This week on Studio SN on You Tube…Watercolor crayons!
I love this technique because it’s super-easy to do, and gives a totally unique look every time you do it. And depending on the color you use, and the amount of crayon, you can alter the intensity. Plus, it just has that pretty watery effect.
Supplies you’ll need:
• Faber-Castell Watercolor Crayons
• Glossy paper
• Stamps: 1008EZ from Paper Artsy
• Paintbrush
• Ribbon
• Blank card
• Shallow container and water
• Stack of clean, absorbent paper for blotting (I pulled some pages from the recycle bin)
Here’s how to do it:
1) Use the knife to shave off some of the blue crayon into the container. Add water and use the paintbrush to dissolve the crayon.
2) Place a piece of glossy paper on a stack of recycled paper. Gently pour the crayon color onto the paper.
3) Tilt the paper to let the water roll around. Add more color as you wish.
4) Turn the glossy paper piece over and place face-down onto the stack of absorbent paper.
5) Let dry, or set with a heat tool.
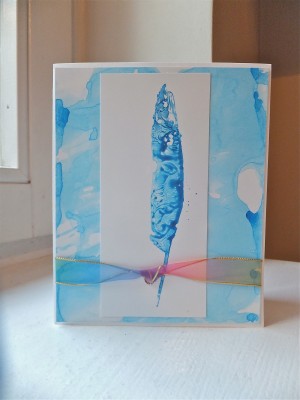
6) Dip the blunt end of the blue crayon into the watery color. (Or into uncolored water, if you wish.) Use it as an applicator to color the feather stamp. Stamp the feather onto a 5 ¾” x 2 ½” piece of glossy paper. Let dry.
7) Assemble the card: Trim the large piece of glossy paper slightly smaller than your card front. (Mine is 6” x 4 ¾”.) Glue the stamped feather piece in the center. Tie a knot in a piece of ribbon and wrap around the matted piece, then glue to the card front.
Want to see the video demonstration? Then stop on by Studio SN on You Tube! Hope to see you there!


