
Welcome to Washi Tape Tuesday! Love washi tape? (Or maybe you have a stash that you want to put to use?) Then join me for tips, techniques and ideas for adding washi tape to your handmade cards!
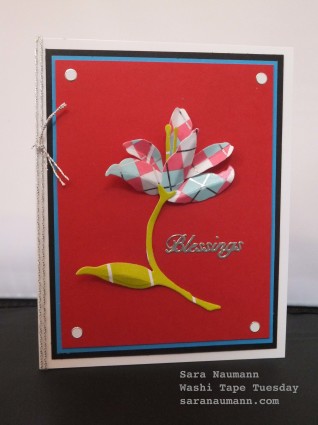
This week I was working with the Garden Notes Lily cutting die from Elizabeth Craft Designs. This is one of those designs that looks complex, but can be made really easily. Of course it looks great out of paper or lightweight cardstock, so I wondered if it would work from washi tape too. And it does! Even better, the tape makes for a fun patterned design (I love this harlequin from Little B) and when you apply the tape to cardstock before die-cutting, you’ll get elements with extra stabilty—perfect for shaping into a dimensional flower!
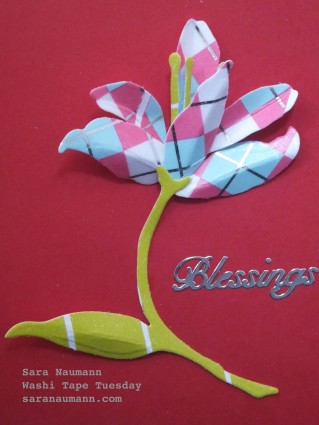
Here’s a close-up—
Washi Tape Lily, what you need—
– Tape: Silver Foil Pink Harlequin Decorative Tape (Little B), green solid washi tape (MT)
– Garden Notes Lily by Susan Tierney Cockburn (Elizabeth Craft Designs)
– Cardstock: White, red, teal, black
– Dazzles™ stickers: Silver Tiny Words & Phrases, White Jewel (Hot Off The Press/Paper Wishes)
– Silver embroidery thread
– Scoring tool and soft surface (a mouse pad is ideal)
– Quilling tool (optional)
– Liquid glue, toothpick
Washi Tape Lily, how to make it—
1. Place harlequin decorative tape on white cardstock, leaving a narrow space between the strips. Tip: Choose cardstock that’s slightly lighter weight—very thick or sturdy cardstock can be a bit too bulky. Die cut the flower base and petals.
2. Place strips of green washi tape on white cardstock, again leaving space between each strip. Die-cut the stem and flower stamen.
3. Place the die-cut pieces onto a soft surface, like a mousepad, and use the scoring tool to score the center of the petals and the leaf. Gently crease them to add dimension.
4. Use the toothpick to apply a bit of liquid adhesive to the flower stem—but not the top of the stem. Glue to red cardstock. Glue the flower petal base to the red cardstock, tucking it under the top of the stem.
5. Roll the stamen—a quilling tool makes this very easy. Glue the ends together and glue inside the flower petals. Add the remaining flower petals.
6. Mat on teal, then black cardstock, adding the Dazzles™ word sticker and jewel Dazzles™ in the corners. Glue to the card front. Wrap the card front with silver embroidery thread.
Easy! I love how easily the washi tape die-cuts, and how dimensional the results are. Even more so, since the tape gives the cardstock extra stability.
Love washi tape? Want tons of ideas, techniques and card projects? Twenty to Make Washi Tape Cards is packed with 20 washi tape projects, each with complete step-by-step instructions—PLUS 20 alternate card ideas…you get 40 creative washi tape card project ideas in all. Available from Search Press, this instruction book is the perfect thing for cardmakers who love washi tape! Click the video below to learn more!


