
Happy Wednesday!
Today I’m so excited to share my latest obsession: Foiling. I love the look of metallic foiling on cards, but frankly I don’t have the space or the budget for a hot-foiling machine…so I was super excited to see that Prima has a fabulous collection of gorgeous foil sheets plus adhesive rub-ons that work together so you don’t need a machine. Just use the wooden craft stick to burnish the foil onto the adhesive rub-on, peel it off and you’re set to go.
Now here’s the other thing: Christine Adolph.
Stampers, those of you who’ve been stamping for awhile probably recognize her name—and if you’re like me, you have some of her wood mounted stamps from Stampington. I could not be more excited to see that her signature collage artwork is featured in the Prima rub-ons. *swoon*
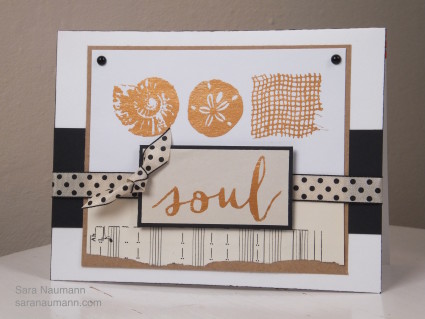
Okay, here’s the card again—
Simple design, minimalist look…but with beautiful classic gold foiling. Plus, of course, Christine’s lovely seaside artwork.
Prima Foils Card, what you need—
– Prima Rub-On Foils in Shine On (from the Prima Foil Rub On Collection Kit on Create and Craft)
– Prima Christine Adolph Adhesive Rub-Ons Kindness Words, Sea Shells (from the Prima Foil Rub On Collection Kit on Create and Craft)
– Cardstock: White, black, kraft
– Sheet music
– Black ink pad
– Polka dot ribbon
– Foam tape
– Small black gemstones
– Blank white card
Prima Foils Card, how to make it—
1. Trim the sea shells from the rub-on sheet, keeping the three as a single unit. Separate the liners to reveal the adhesive. Place adhesive side-down onto white cardstock and press with your fingers. Lift off the liner.
2. Trim a piece of gold foil slightly larger than the shells and press onto the shells, with the colored foil side facing up. Press with your fingers, then use the craft stick (included in the package) to burnish the foil. Lift off the foil. Note: If some areas did not get foiled, simply place the foil sheet back onto the adhesive and repeat the pressing and burnishing.
3. Tear a piece of sheet music and glue to the bottom of the foiled piece. Mat on kraft cardstock.
4. Ink the edges of a white card blank with black. Glue a strip of black cardstock horizontally across the card front. Glue the foiled piece in the center. Wrap with dotted ribbon.
5. Foil the word “soul” on the margin of a piece of sheet music. Mat on black cardstock, then adhere to the card front with foam tape.
6. Tie a knot in the polka dot ribbon and glue as shown. Add two black gemstones in the top corners of the foiled piece.
This foiling is so easy…and so beautiful. The rub-on designs really lend themselves to minimalist card designs, which I love. Plus, you get a really elegant look without a lot of fuss.
These supplies were from my appearance this month on Create and Craft TV. You can pop over to the Create and Craft website to find them all.


Your card is GORGEOUS!
Thank you, Sue! 🙂