
For easy and elegant Christmas cards, you can’t go wrong with Hunkydory’s Liftables. These printed pages are partially die-cut so you can lift the edges to create dimension. They’re on sturdy (250gsm) uncoated cardstock, so you can ink and color to create your own custom look. In this case, I’ve used one sheet from the Sparkling Snowflakes pad as the partially-lifted background, then cut out some of the other elements from the pad to use as focals. The blue backing cardstock is also from the same pad.
I found the Liftables work perfectly with Distress inks—in this case, I’m using Distress markers, but you could also use inkpads. 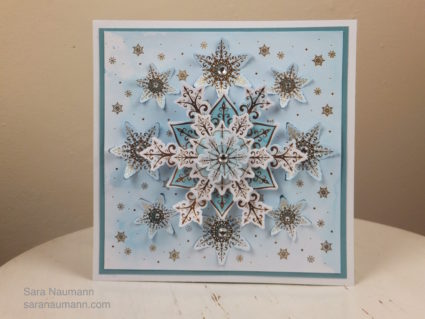
Snowflake Christmas Card with Hunkydory, what you need–
Sparkling Snowflakes Liftables Pad from Hunkydory
Distress Markers: Salty Ocean, Broken China from Ranger
Craft sheet
Water mister
Foam tape
Self-adhesive rhinestones
Square card blank (mine is 6 1/2″)
Snowflake Christmas Card with Hunkydory, how to make it–
- Scribble Salty Ocean and Broken China markers on your craft sheet. Spritz with water, then place the gold embossed snowflake sheet directly into the wet ink to color the entire piece.
- Let air dry or speed up the dry time with a heat tool.
- Trim slightly on all four sides. Gently lift up the snowflake edges. Add self-adhesive rhinestones to the center of the snowflakes.
- Mat the snowflake sheet on blue cardstock from the pad and glue to the card front.
- Use scissors to snip three snowflakes from another sheet from the pad: One large, one medium and one small snowflake. Color the centers with markers, then spritz with water, allowing the marker color to bleed. Let dry, then stack on the card front with foam tape. Add a rhinestone to the center of the top snowflake.
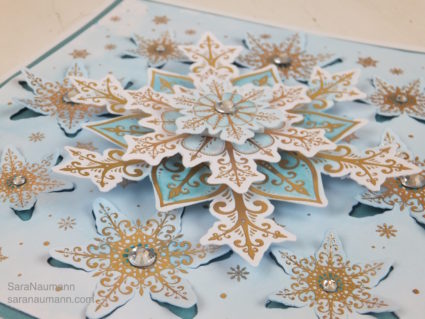
Here’s a close up of the layering:
Enjoy!


