
November is the time for thankfulness—and this easy and versatile design is a perfect way to thank the special people in your life.
I’m using the Couture Country Life collection for this card. (The dies are available at Create and Craft in the UK and the USA.) They’re designed to give you lots of options to “set a scene” on your paper crafts. I’ve chosen the tree as my focal, which can be dressed up with leaf die-cuts to be a spring or summer tree as well.
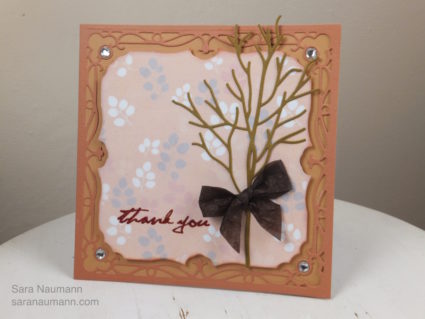
The patterned paper is from the CD that comes with the collection. You just put the CD into your computer and print the design you want on your home printer. (I use 220g/m cardstock.) I love the leaves, but wanted them a bit more muted so the bare tree would stand out. The solution was to layer the pattern with vellum. Yes, I could have also printed the paper design onto vellum, but I wanted to mount it on foam tape and the tape would have shown through.
In the end, the design is so easy to create and adaptable for lots of occasions, from autumn birthdays to masculine cards as well.
Couture Thank You Set the Scene Card, what you need—
– Couture Set the Scene Collection Country Life dies from Create and Craft (comes with CD with printable patterned paper) Visit Create and Craft in the UK and the USA for more information.
– Vellum
– Cardstock: Light brown, medium brown, dark brown
– Altenew ink: Paper Bag
– Altenew stamps: Many Thanks
– Embossing ink pad
– WOW! Embossing powder: Primary Burgundy Red Regular
– Cosmetic wedge
– Card blank
– Spray mount adhesive
– Foam tape
– 6” square card blank
– Brown silk ribbon
– Self-adhesive rhinestones
Couture Thank You Set the Scene Card, how to make it—
1. Use the square die to cut a piece from light brown cardstock and glue to the front of the card blank.
2. Nest the square die, the intricate border, and the scalloped square together to cut the frame from medium brown cardstock. Glue to the card front. Note: You can use lots of different adhesives for this, but a spray mount adhesive is one of my favorites.
3. Use the scalloped square die to cut a piece from vellum and another from leaf patterned paper. Stamp and emboss “thank you” at the bottom left of the vellum. Use spray mount adhesive to adhere the vellum on top of the patterned paper. Use the cosmetic wedge to gently ink the sides with Paper Bag.
4. Adhere in the center of the card with foam tape.
5. Die cut the tree from dark brown cardstock and glue to the right side of the card front.
6. Tie a bow in brown silk ribbon and glue to the card front. Add self-adhesive rhinestones to the corners of the frame.


