
Today on Studio SN on You Tube: Clearsnap Chalk Ink Resist with Eclectica Stamps!
I love a good resist technique. There’s just something magical about it!
This is one of the easiest resist techniques around, and unlike using paint, this is basically mess-free. And the resist effect will be a soft, subtle one—perfect for backgrounds. In all my experiments, I’ve found Clearsnap’s Chalk Ink is really the best for this. It’s a very juicy inkpad and it blends beautifully.
Let’s take a look!
You’ll need:
– Watermark inkpad (Ranger)
– Plumeria Chalk inkpad (Clearsnap)
– Glossy cardstock
– Stamps: ESN05 from Paper Artsy
– Brayer
– Gold Metallic Shimmer Sheetz from Elizabeth Craft Designs
– Cuttlebug Textile Tapestry embossing folder and embossing machine
– Sheer yellow ribbon, gold brad
– Off-white matte cardstock
– Jet Black Archival inkpad (Ranger)
– Dry cloth or tissue
– Clear tape
Here’s how to do it:
1. Stamp a 4 3/8″ x 4 1/4″ piece of glossy white cardstock with watermark ink. Let the ink dry thoroughly.
2. Press the chalk inkpad directly onto the glossy cardstock and cover the entire piece. If you like, use a brayer to smooth out the ink. Tip: Choose ink in a dark or bright color for the most contrast and impact.
3. Use a tissue or cloth to buff the ink so it’s completely blended. Ink the edges with Plumeria; when dry, mat on off-white cardstock.
4. Cut a 5″x5″ piece of gold Shimmer Sheetz. The embossing plate is not as wide as the Shimmer Sheetz piece, so here’s how to emboss the entire thing: Line up the edge of the embossing plate with the edge of the Shimmer Sheetz, then emboss. Remove the Shimmer Sheetz from the embossing folder and realign the pattern slightly overlapping the embossed design. Run through the embossing machine again.
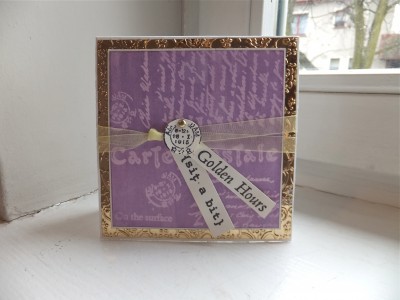
5. Glue the resisted piece to the Shimmer Sheetz. Hold two pieces of yellow ribbon together and tie in a knot. Wrap around the piece, securing the ends to the back of the Shimmer Sheetz piece with tape.
6. Use the black inkpad to stamp “golden hours” and “sit a bit” on off-white cardstock. Cut into strips and glue to the card front. Stamp the postmark on off-white cardstock and cut around the edge, then add a gold brad at the top and glue to the card front.
That’s it—easy! If you’d like to see the video tutorial, pop on by and see the Clearsnap Chalk Ink Resist segment on Studio SN on You Tube!
Happy Wednesday!


