
Today on Studio SN on You Tube: How to Stamp and Heat Emboss on Washi Tape!
Yes, you can heat-emboss stamped images on washi tape! Let’s take a look at how easy it is to add color, sparkle and dimension to your washi tape cards.
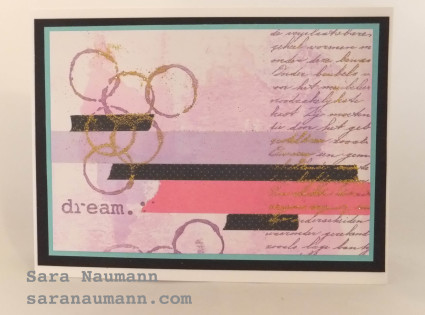
Stamping and Embossing on Washi Tape, what you need:
• Washi tape: Lavender solid, pink solid, narrow black with white dots
• Stamps Eclectica ESN10 (PaperArtsy)
• Plumeria Chalk Ink: Clearsnap
• Pearl Gold Sparkle Embossing Powder (WOW Embossing)
• PL1, HB3 Spectrum Noir alcohol ink refills (Crafter’s Companion)
• Brayer
• White, black, teal cardstock
• Craft sheet
• Clear tape
Stamping and Embossing on Washi Tape, how to do it:
1) Use the brayer to apply PL1 alcohol ink refill onto a piece of white cardstock. Repeat with HB3.
2) Add strips of washi tape horizontally across the piece of brayered cardstock.
3) Stamp the script design with Plumeria. Quickly add circles on top of the washi tape and at the bottom of the cardstock piece. Immediately sprinkle gold embossing powder on some of the wet ink areas. Tap off excess and heat-set. Take care not to over-heat the piece; if the tape begins to lift, turn off the heat tool, let it cool and press the tape back into place.
4) To stamp “dream”: Mount the quote stamp on a block. Use clear tape to mask off all the words except “dream”. Ink the stamp with Plumeria, remove the tape and stamp the word on the cardstock.
5) Mat on teal and black cardstock, then glue to the front of the blank card.
That’s it—easy, isn’t it? To watch the video tutorial, simply pop on by Studio SN on You Tube to see How to Stamp and Heat Emboss on Washi Tape!
Happy Wednesday!


