
Today on Studio SN: Metal Stamping for Cardmaking!
I’ve mentioned before how much I love metal stamping now that I have a proper set of supplies. I tried this technique years ago with a greasy set of industrial letter stamps and the hammer from the garage. My results were sometimes dreadful (uneven letters, half-stamped impressions) and sometimes what could be generously called “quirky”. Rarely did it come out perfectly.
Then last year at a trade show, I got a chance to try the metal stamping supplies from ImpressArt. It was so easy that I thought it was a fluke. Then I kept at it and realized it was no fluke, just much better supplies! Amazing!
Of course metal stamped pieces make great jewelry but they can also be used on cards.
Here’s what you need:
– Metal Stamping Kit with Newsprint font: ImpressArt (contains complete alphabet set, hammer, stamping block)
– 1 5/8″ Silver Tag with Holes Soft Strike stamping blank: ImpressArt
– Stamp Straight™ Tape: Impress Art
– Small Mica Tiles (USArtquest)
– Black fine tip pen (.5mm)
– Fancy Feathers patterned paper (Hot Off The Press/Paper Wishes)
– Mystic Feathers Dazzles™ (Hot Off The Press/Paper Wishes)
– Black cardstock
– Gold embroidery thread, black ribbon, silver brads
– Foam tape
Here’s how to make it:
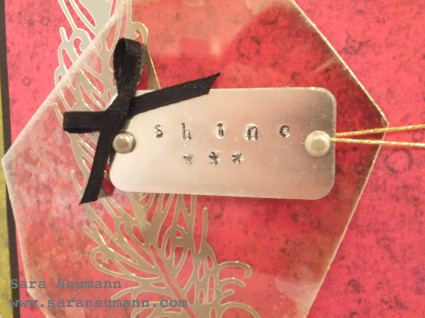
1. Place the stamping blank on the stamping block and secure with Stamp Straight Tape. Use the pen to mark a line for each letter. Start with the center letter: Hold the stamp with the ImpressArt logo pointing toward you, then nest the edge of the stamp along the tape. Hold it firmly and strike with the hammer. Repeat with the other letters.
2. Use the pen to color in the stamped letters. Note: If any stray ink gets on the stamping blank, quickly wipe it off with a tissue.
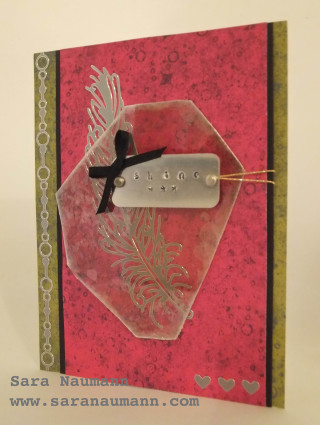
3. Cover the card front with green patterned paper. Add a silver border sticker along the fold of the card.
4. Mat a 3 1/2″-wide strip of pink patterned paper on black. Add a feather sticker in the center and a piece of mica tile on top. (Place the glue where the tag will cover it up.) Insert a brad in each hole in the tag and open the legs to the back of the tag. Use foam tape to attach it to the mica. Wrap gold embroidery thread around the brad on the right, securing the ends to the back of the matted piece.
5. Glue to the card front. Add a bow tied in a piece of black ribbon.
That’s it—easy, fun and a super way to create shine and texture on a card!
Want to see the video tutorial for this handmade card? Then pop by Studio SN on You Tube to watch Metal Stamping for Cardmaking!


