
Happy Wednesday—today I want to share a fun, glittery card design that’s a snap to make!
I’m using the Kaleidoscope Card Kit from FabScraps—this will contain the card blank, patterned paper, chipboard and embellishments. I planned this as a demo last month when I was on Create and Craft, but we ran out of time…no craft project goes to waste in my world so I’m happy to share it with you here!
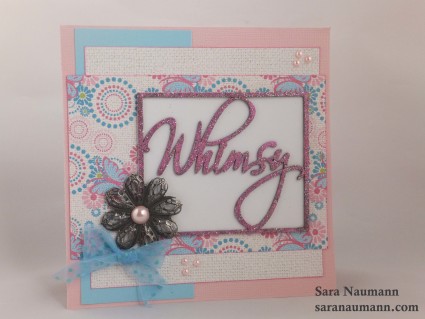
Kaleidoscope Glitter Whimsy Card, what you need—
– Kaleidoscope Card Kit (FabScraps). If you’re in the UK, you can find it at Create and Craft UK; for the US, try the Create and Craft USA channel.
– Cupid pigment inkpad (Clearsnap)
– Clear Multi Sparkle Embossing Glitter (WOW Embossing)
– Heat embossing tool
– Cardstock: White, blue
– Craft glue
– Blue sheer ribbon
– Scrap paper—one sheet folded in half
– Craft sheet
Kaleidoscope Glitter Whimsy Card, how to make it—
1. Place the “whimsy” chipboard embellishment on top of your folded scrap paper and press the Cupid inkpad on top to coat it completely. Place the inky chipboard inside the folded sheet of scrap paper and sprinkle with the clear glitter embossing powder. Tap off excess and use the folded sheet to funnel it back into the jar.
Tip: You can cut the word “whimsy” from the frame—it’s chipboard, so it will cut easily with scissors.
2. Place the chipboard piece on the craft sheet and heat-set the embossing glitter. Tip: Let the piece cool thoroughly before handling.
3. Use craft glue to mount the embossed piece on white cardstock.
4. Glue a 2 1/2″-wide strip of blue cardstock on the left side of the card front. Cut a 5 1/4″ x5″ piece of tan faux-texture paper and ink the edges with Cupid. Glue to the card front. Ink the edges of a 4″ x 5 3/4″ piece of butterfly paper with Cupid and glue to the card front.
5. Glue the embossed Whimsy piece to the right side of the card front.
6. Glue a metal embellishment to the corner of the Whimsy piece. Add a large pink cabochon in the center. Tie a bow in blue ribbon and glue as shown.
7. Add three small pink cabochons to the top right corner of the card front, and the bottom left.
Easy! Even better, this card can be customized to any color palette—just switch papers and embossing powder to get a completely different look.


