
Happy Wednesday, everyone!
Last week I was on Create and Craft with some really fun Maya Road papers, a fabulous Flip Calendar and some super-cute cutting dies. As always, I end up with more ideas than air time—which is actually great, since I can share them with you here!
For this card, I’m using leftover papers and dies from the Maya Road Ultimate Calendar Kit. The paper collection gives you two sheets per design, so I could use one sheet for my calendar and the rest for cards!
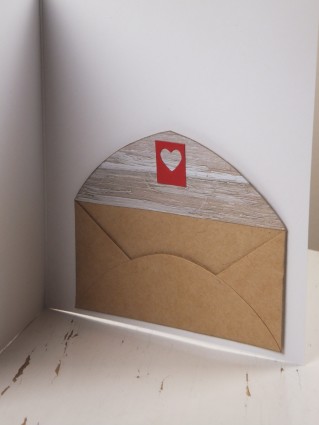
I’m a big coffee drinker, and so are a lot of people I know—which makes this design perfect as a card, but also to go along with a gift from a favorite coffee shop. Keep reading and you’ll see the cute Maya Road envelope on the inside…just the right size for a gift card!
Maya Road Coffee Card, what you need—
Maya Road Flip Calendar kit (for patterned papers, jute, label and mini envelope on the card inside)
Maya Road All Seasons Themed Die kit (for the coffee die collection)
Black, red, white, silver cardstock
Cork paper
Altenew Moon Rock inkpad (Warm Gray collection)
Card blank
Washi, stencil or masking tape
Die cutting machine
Foam tape
Maya Road Coffee Card, how to make it—
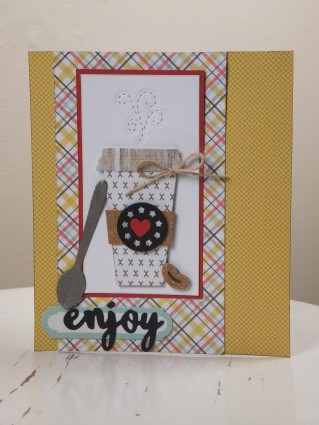
1. Cover the card front with yellow check paper. Cut a 3 1/2″-wide piece of plaid paper and ink the long edges with gray, then glue to the card front. Ink the edges of the card with gray.
2. Cut a 4 1/4″ x 2 1/4″ piece of white cardstock. Place the steam die at the top center and tack down with washi or stencil tape. Run through the die cutting machine. Mat on red cardstock and glue to the card front.
3. Die cut the coffee cup from “x’s” patterned paper, the lid from woodgrain patterned paper and the coffee sleeve from cork paper. Ink the edges of the cup with gray, then assemble the cup as shown. Die cut the circle with stars shape from black, back it with woodgrain patterned paper and add a red die cut heart at the center. Glue to the coffee cup. Use foam tape to attach the cup to the white cardstock, just below the steam.
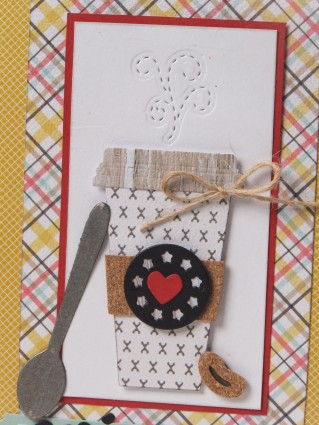
4. Tie a bow in a piece of tan jute and glue as shown. Die cut the coffee bean from cork, back with black cardstock and foam-tape it next to the coffee cup. Die cut the spoon from silver cardstock and glue as shown.
5. Glue a label to the bottom left side of the card front. Die cut “enjoy” from black cardstock and glue as shown.
I love the idea of this card for gifting as well—inside my card, I’ve got a Maya Road mini envelope that’s the perfect size for a gift card to the recipient’s favorite coffee shop. Here, I’ve just lined the top flap with woodgrain patterned paper and added the negative from my heart die cut.
For more info on these Maya Road goodies, pop on by Create and Craft. Enjoy!


