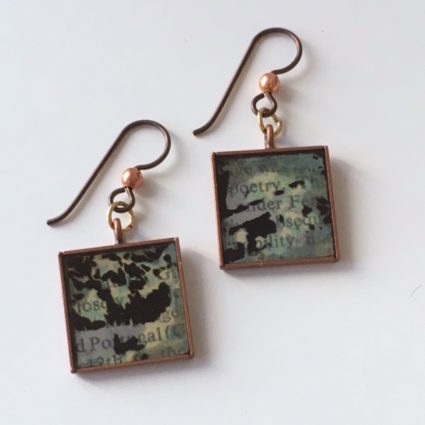
Today on Resin Jewellery Tuesday: Lazertran ICE Resin Earrings!
New to Resin Jewellery Tuesday? Each week we to explore a new project using ICE Resin® from Ranger. These projects are based on the resin techniques covered in my latest book from Search Press, How to Make Resin Jewellery.

I love Lazertran. If you’re not familiar with it, this is a waterslide decal paper—you can print onto it with your home printer, or even stamp on it or create unique backgrounds. Then, simply soak the decal in water and slide the two layers apart. You’ll remove the liner, then have the printing on a decal which you can layer onto another paper. The base paper will show through, as the dried Lazertran will have a slightly muted look. I love layering photos onto book or text paper. The Lazertran provides a ghosted effect, but the words are still visible.
(If you want to watch a video showing the Lazertran process—albeit for another project—then pop over to the How to Make a Photo Transfer with Lazertran video.)
For jewellery this small, it’s also great to use photos that have a lot of abstract elements. Since I wanted the earrings to coordinate but not match exactly, I simply punched from two similar areas of the photo.
Lazertran ICE Resin Earrings, what you need—
- ICE Resin® two-part epoxy (includes cup and stir stick)
- Lazertran Waterslide Decal paper (choose the one that works with your home printer)
- Disposable gloves
- Baby wipes
- Mod Podge or other clear sealer
- Lazertran waterslide decal paper
- Text paper
- 2 square antique copper plated bezels—17mm
- 2 ear wires with copper ball
- 2 antique gold jump rings—4.5mm
- 5/8” square punch
- Toothpick
- Chain nose pliers
- Shallow pan of water
- Paper towel
Lazertran ICE Resin Earrings, how to make them—
1. Print a photo on Lazertran, then soak and separate the decal. Use sealer to adhere it to a piece of text paper. Let dry, then punch two squares. Glue each photo square into a square bezel.
2. Place the bezels onto a raised, flat surface with the loops hanging over the edge. Mix the resin, then pour into the bezels. Let cure.
3. Use the pliers to open a jump ring and slip on the cured bezel and the ear wire. Close the jump ring. Repeat for the second earring.
Like this project? Get all the info on creating resin jewelry with my latest book, How to Make Resin Jewellery, from the award-winning UK publisher, Search Press. You’ll find step-by-step instructions on mixing and pouring resin, plus over 50 project ideas with instructions. Check it out at Search Press!