Welcome to Washi Tape Tuesday! Love washi tape? (Or maybe you have a stash that you want to put to use?) Then join me for tips, techniques and ideas for adding washi tape to your handmade cards!
Today I was in a die-cutting mood, so I grabbed some of my favorite metal dies and a few washi tapes, and got to cardmaking!
Soooo easy! And such a great way to get lots of color and style, too.
A couple of tips when you’re die-cutting washi tape embellishments. First, you’ll want to adhere the washi tape to standard weight cardstock. Here’s what I started with:
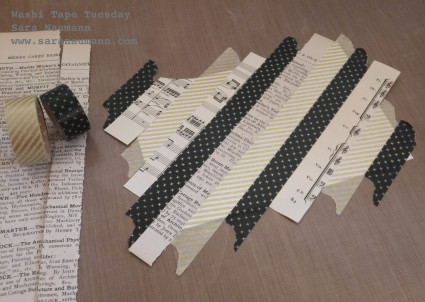
As you can see, I’ve alternated strips of gold metallic stripe tape, book paper, sheet music and black “x” washi tape. The tape is placed at an angle on the white cardstock. It’s important that the cardstock be white or off-white, so the pattern on the tape shows up. I also included cut strips of book paper and sheet music. Yes, these are pulled from old books! I love the contrast between the aged paper and the crisp washi tape. They’re glued down with a glue stick.
It’s really important that all the strips are firmly adhered to the cardstock—that means, nice, even coverage on the glue for the paper, and burnishing the tape down well. Otherwise, loose ends of the tape or paper can peel up on the edges of your die-cut piece.
Then just trim the ends around the edges of the cardstock and run it through your die-cutting machine.
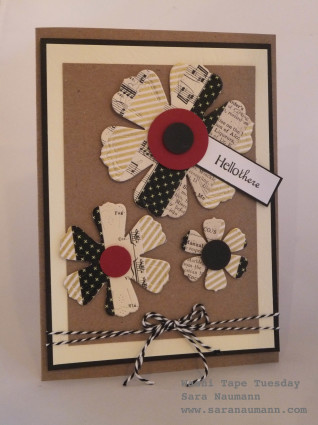
Washi Tape Tuesday: Hello There
What you’ll need:
• Gold metallic, black “x” washi tapes: MT
• Bodacious Blooms cutting dies: Hot Off The Press
• Die-cutting machine: I used my Cuttlebug
• Book paper, sheet music, cut into strips
• Glue stick
• Cardstock; kraft, cream, white black, red
• Greetings & Labels stamps: Hot Off The Press
• Black inkpad
• Black and white baker’s twine
• Foam tape
• Circle punches: 1 1/4″, 3/4″
How to make it:
1) Adhere strips of washi tape and book pages on a piece of white cardstock. Die-cut three flowers. Note: I had to run my die-cutting sandwich forward, then backward on my Cuttlebug to get a crisp cut.
2) Use foam tape to attach the flowers to a piece of kraft cardstock. Mat on cream, then black. Wrap with baker’s twine. Glue to the front of a kraft card base.
3) Circle-punch red and black flower centers, then add to the flowers with foam tape.
4) Stamp “hello there” on white cardstock, mat on black and add as shown.
So simple and easy—I think it would also be a really adaptable card, too. You can swap out the washi tape colors and patterns to be bright and playful, or vintage.
Enjoy…and happy Washi Tape Tuesday!
Love washi tape? Want tons of ideas, techniques and card projects? Twenty to Make Washi Tape Cards is packed with 20 washi tape projects, each with complete step-by-step instructions—PLUS 20 alternate card ideas…you get 40 creative washi tape card project ideas in all. Available from Search Press, this instruction book is the perfect thing for cardmakers who love washi tape!