This month on Studio SN on You Tube: Make a Journal Cover with the Brother Handheld Labeller!
Earlier this spring, I was demonstrating the Brother Hand Held Labeller on Create and Craft. I am not a gadget kind of person but I found I really fell in love with this little machine…it’s great for organizing, but of course I love the papercrafting potential too!
Easy Personalized Journal, what you need:
Kraft notebook (I got mine at my local craft store)
Brother P-touch H101GB Hand Held Labeller
Black watercolor (Kuretake)
Waterbrush (Kuretake)
Oval cutting dies (Tattered Lace)
Cardstock: White, black
Spray mount adhesive (optional)
Easy Personalized Journal, how to make it:
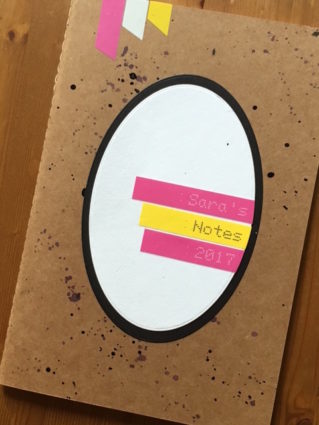
- Make a watery wash of black watercolor and use the waterbrush to spatter the color on the journal cover. Let dry.
- Die cut a white oval. Use the labeller to print out your name and date on pink label tape, and “notes” on yellow. Adhere to the oval, trimming the ends evenly with the side.
- Die cut a larger black oval. Layer the two together and glue to the front cover of the journal. I use spray mount adhesive, but any strong adhesive will do.
- Snip a small bit of white, pink and yellow label tapes. Trim one end at an angle and adhere to the top of the journal cover as shown. (I use my leftover bits saved from previous projects.)
That’s it…so easy! If you like the idea of crafting with your labeller, stick with me as I’ll have more projects and videos coming up soon.