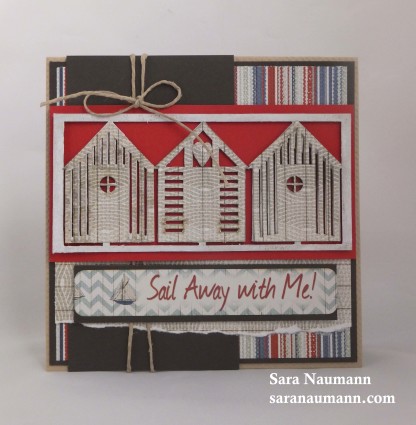
Happy Wednesday! Today we’re headed to the seaside with a fun and easy beach-themed card!
This card features fun laser-cut chipboard shapes and matching patterned paper laser die-cuts for a touch of dimension. Simply glue the patterned die-cuts on top of the chipboard piece and you have instant texture and style. I’ve painted the chipboard first but you can also use it in it’s natural kraft color if you prefer.
Beach Bliss Card, what you need—
• FabScraps Beach Bliss Card Kit (includes blank card, chipboard, laser-cut pieces, patterned papers and card message) Crafters in the US and Canada can find this on Create and Craft’s website; if you’re in the UK or Europe, check the UK site.
• Cardstock: Brown, red
• Twine
• White paint
• Foam tape
Beach Bliss Card, how to make it—
1. Paint the laser-cut chipboard beach hut piece with white. When dry, glue the patterned paper beach huts on top. Mat on red cardstock.
2. Cut striped paper slightly smaller than the card front and mat on brown cardstock. Glue to the front of the card. Cut a strip of brown cardstock and glue vertically to the left side of the card front.
3. Tear one edge of a piece of brown patterned paper and glue it horizontally across the card front. Wrap the card front vertically with twine, securing the ends to the front where they will be covered by the beach huts.
4. Use foam tape to adhere the matted beach huts to the card front.
5. Glue the “sail away with me” sentiment on brown cardstock and foam tape to the card front.
6. Tie a bow in the twine and glue at the top of the card front.
That’s it—easy! Have a happy Wednesday and see you again next week!