
Hello and happy Wednesday!
In addition to Project Wednesdays, I want to add something new to the mix. Every so often (I’m still deciding on the time frame) I’ll do a Facebook Live or a filmed Facebook video with a quick technique. While some will be live and others pre-recorded, you’ll always be able to watch on Facebook or here.
This time I’m experimenting with my Eclectica ESN 20 stamps from PaperArtsy, Kuretake markers and my never-leaves-my-desk MISTI stamp positioner.
You can watch the video here and keep reading to find the step-by-steps and links. Enjoy!
I'm starting a new technique tutorials program here on Facebook…hope you can join me for quick technique-based stamping and card making videos. Today I'm playing with PaperArtsy stamps and Kuretake UK markers, plus my (new best friend) MISTI. (@mysweetpetunia)
Posted by Sara Naumann on Tuesday, March 27, 2018
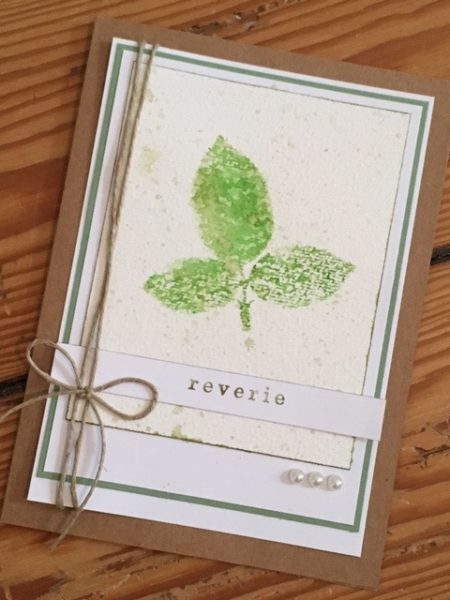
Reverie card, what you need—
Kuretake Clean Color markers: Yellow, May Green, Olive Green
Eclectica ESN 20 stamp set from PaperArtsy
Watercolor cardstock
Smooth cardstock: White, green
Kraft card base
Water mister
Twine
Pearl embellishments
Reverie card, how to make it—
1. Remove the pad from the MISTI. Place a piece of watercolor card onto the base. Secure with magnets. Place the leaf image on top of the cardstock, then close the MISTI. The stamp will cling to the facing side.
2. Use the Yellow marker to color directly onto the stamp. Add more color with May Green. Spritz lightly with water, then close the MISTI to stamp the image onto the cardstock.
3. Open the MISTI and add Olive Green marker to the stamp. Don’t spritz, just close the positioner to stamp the image a third time.
4. Remove the cardstock and place it on a craft sheet. Scribble Olive Green marker onto the craft sheet, spritz with water and use a small paintbrush to spatter watery color onto the cardstock piece.
5. When dry, use the Olive Green marker to edge the watercolor cardstock piece, then mount on white cardstock, then green and again on white.
6. Color “reverie” with Olive Green and stamp onto smooth white cardstock, without spritzing. Trim, then edge the top and bottom with Olive Green. Glue across the bottom of the watercolor piece. Wrap twice with hemp twine.
7. Glue the entire piece to the kraft card base. Add pearls and a bow tied in twine.
This is such a classic stamping technique, and gives you a variety of options in terms of color combinations. And remember, the intensity of color will change depending on how much water you use, too!
Thanks for joining me today!
wonderful project
very easy to follow your tutorial
thank you Sara
Thank you, Christine! 🙂