
Today on Studio SN on You Tube: Texture Embossing on Washi Tape!
I adore this technique—it’s so simple to do, yet gives such great texture and dimension to your cards.
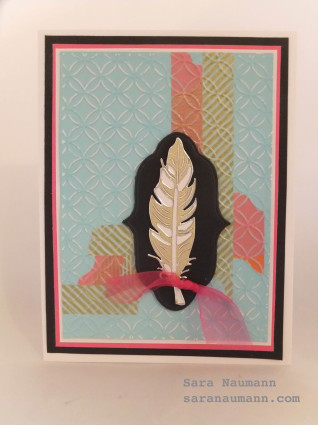
Texture Embossing on Washi Tape, what you need:
– Gold stripe, pink/orange patchwork washi tape: MT Washi Tapes
– Fresco Finish Mermaid paint: PaperArtsy
– Circles Interlock embossing plate: Darice
– Gold Pearl Feathers Dazzles: Hot Off The Press
– Labels 33 cutting dies: Spellbinders
– Embossing/die cutting machine: Cuttlebug
– Emery board or sandpaper
– Cardstock: White, pink, black
– Sheer pink ribbon
– Blank white card
Texture Embossing on Washi Tape, how to make it:
1. Paint white cardstock with a coat of Mermaid. Let dry, then place strips of washi tape horizontally and vertically.
2. Place in the embossing plate and run through your embossing machine.
3. Use the emery board to gently sand on the raised areas of the cardstock, including the washi tape.
4. Die-cut a black label. Adhere a feather sticker to white cardstock and trim around, then glue to the label. Glue to the embossed piece as shown.
5. Mat on white, pink and black cardstock and glue to the card front.
6. Add a knotted piece of pink ribbon.
That’s it—simple! Want to see the video tutorial? Then stop by Studio SN on You Tube to watch the Texture Embossing on Washi Tape video!


